Quicksalt: The Easiest & Fastest Chlorinator Install
Having a pool means to be able to enjoy of good moments in the company of your family and/or friends, or even of relaxation. That is why it is very important to keep its water in excellent conditions and therefore be able to guarantee a pleasant swim for everyone and without worries.
It is true that to be able to disinfect the pool water and that it is free of pathogens and of organic matter, different methods exist. However, these processes can be annoying and complicated to carry out, and so we tend to go to a professional.
On the other hand, in recent years, one of the most popular swimming pool water disinfection processes is salt chlorination. It is a process that is carried out through salt’s own chlorine (NaCl), so it could be said that it starts from a totally natural component. Also, thanks to its high degree of automation, its speed, and its efficiency, it is a system that totally facilitates the pool maintenance process.
PRIVATE POOLS WITH SALT CHLORINATION
To offer a salt chlorination system that is effective, intuitive, and easy to use, Quicksalt was born. A compact chlorinator of domestic use perfect for private pools.

The Quicksalt chlorinator was thought out and designed to offer a practical solution to all of those who own a private pool and wish to keep them in excellent conditions without having to go to a technician.
In addition, thanks to its low electricity consumption and high technical performance, it is the perfect solution to respect the environment.
Apart of this, one of the most important points that was considered during the design stage of the equipment, is that it could be an easy and quick equipment to install which, following a series of steps and indications, could be installed by any person with minimum electricity and DIY knowledge.
WHAT IS NEEDED TO INSTALL THE QUICKSALT
Before carrying out the chlorinator’s installation, make sure you have the following elements at your disposal:
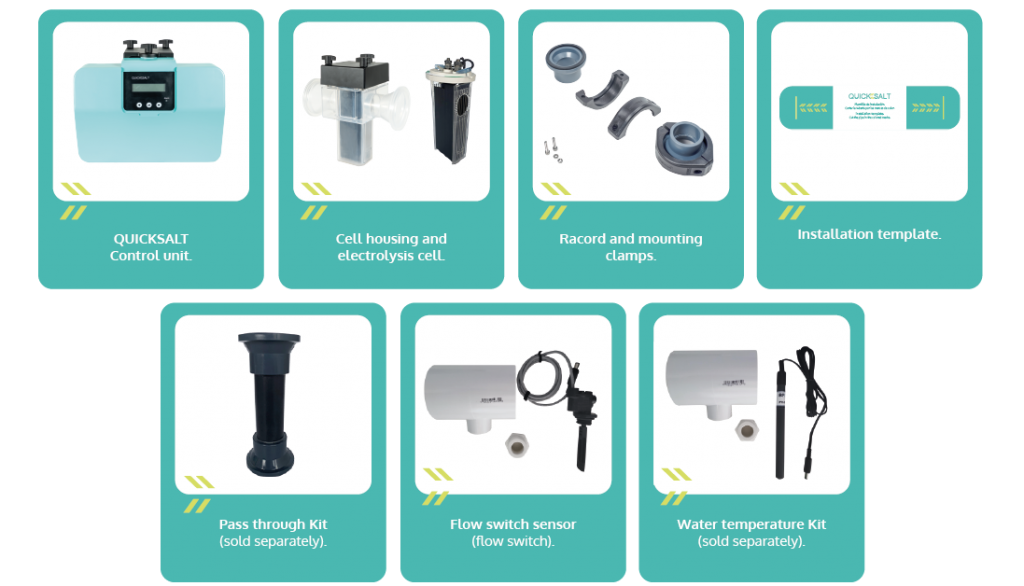
In addition, you will need the following necessary tools for the electric and hydraulic installation:
- Cleaner and glue for PCV pipes.
- Cutting saw suitable for PVC pipes.
- Set of Allen keys.
- Set of screwdrivers and tools necessary for the electrical connection to the pump control and protection panel.
- Electric drill to install the flow switch (optional).
HOW TO QUICKLY AND EASYLY INSTALL THE QUICKSALT
Firstly, and to carry out the installation, we must make sure that the chlorinator is turned off and disconnected from the electrical network.
Once this is done, we can carry out the hydraulic installation. To do this, the pipe will have to be marked with the supplied template and then cut to the appropriate size.
Following this we will install the electrolysis cell. To do this we will have to put glue on both adapters and the ends of the pipe. Once this is done, we place the two gaskets in the cell, attach it to the pipe and close with the two closing clips.
Now that the hydraulic installation is done, the mounting of the electronic control unit must be carried out. The Quicksalt salt chlorinator was created to be able to adapt itself to the different installation booths, therefore two different types of mounting exist: type A and type B.
TYPE A MOUNTING:
This mounting is the one in which the cell and the electronic control unit are mounted together.
Once the hydraulic installation is done, the chlorinator electronic control unit will have to be fitted by inserting it into the front housing of the cell. Next, the three cables of the cell will have to be connected through the aerial connectors.
TYPE B MOUNTING:
This mounting is the one in which the cell and the electronic control unit are mounted separately.
Once the hydraulic installation is done, the electronic control unit will have to be hung on the wall with the rear brackets. Then the control unit will be connected to the cell with the extension cable.
Note: make sure there is not an excessive distance between the switchboard and the cell so that the extension cable can be connected correctly.
HOW TO ACTIVATE THE QUICKSALT CHLORINATOR
Once the Quicksalt chlorinator is installed, the next step will be to activate it and therefore be able to enjoy of your private pool without worries.
Firstly, we will have to check that the pool water has the 5 g/l of necessary salt and that it follows the following chemical requirements:

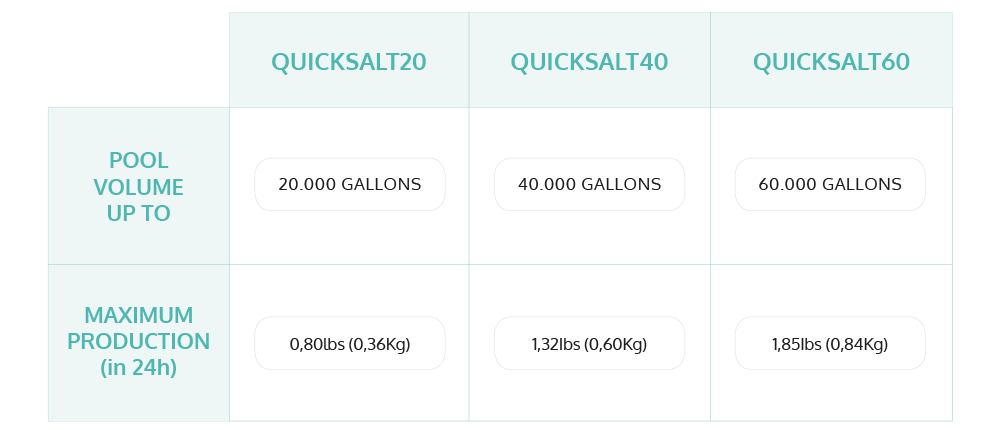
To do this, the first thing we will have to do is select the appropriate chlorine production in grams / hour for each pool. Depending on the volume of the pool in gallons and the maximum production capacity in 24 hours, it will be possible to determine how many pounds will be needed for each installation.
Pressing the right arrow button, we will access the configuration menu. In order to make an adjustment we will have to go to the parameter that we want to modify. Then, after pressing the OK button the value will blink and that is when it can be changed. After pressing the OK button again, the change can be confirmed.
On the main screen of the equipment, you will be able to see the chlorine production in percentages on the first line, as well as the voltage in which it is operating. For its part, in the second line you will be able to see the status of the equipment; if it says OK, it is working correctly without any incident. Otherwise, a warning or alarm will be notified in this area of the screen.
At Quicksalt we want you to be able to install your chlorinator easily and safely, as well as quickly. For that you can watch the installation video that we have made so that each of our users can carry out the installation of their equipment.
If you have any doubts on how to carry out your equipment’s installation, don’t hesitate to contact us and we will advice you from beginning to end.


